Just after installing WordPress and creating your blog, what should be the next step? What are the essential settings after creating WordPress Blog?
All it comes into our mind.
There are so many things that we can do time by time, but here in this post, I would explain some of the important settings you must do after website setup or just before.
How To Use WordPress After Installation / Creating a blog
You can also refer to the complete video if you don’t want to read this.
Let’s quickly check what things to do after installing WordPress.
1# Add Google Analytics to your website
After launching the new website, you must integrate your website with the Google analytics tool.
Google Analytics is a free and powerful tool to track our website traffic.
Through this tool, you can know all.
- How many users are coming to your website
- On which page they are mainly hitting.
- From which region users are coming
- From which device they are hitting your website like Mobile, iPad ,Desktop, etc
And many more.
In other words, you cannot ignore this tool.
You can refer to this Guide on How to add Google Analytics to word-press website.
2# Submit sitemap XML file to Google
Sitemap xml file lists all the vital blogs and pages.
If you submit this XML file to Google, it helps Google’s bots/crawlers easily navigate to your websites.
And it would play an important role in your SEO ranking
This you can do in 3 steps
- Find out / Create your sitemap XML file ( normally nowadays this is created automatically)
- Add your website (property) to the Google search console (a free tool by Google)
- Submit this XML file to the Google Search console
You can refer to my blogs to know in detail, First to know where your sitemap file is existing and then How to submit the sitemap file to Google.
3# Configure the Right Permalink Structure
It is one of the essential parts of your website; as the name suggests, it is the permanent URL of your post.
In WordPress, each post has a specific URL.
As per the Official WordPress Site
Permalinks are the permanent URLs to your blog posts, as well as categories and other lists of weblog postings.
A permalink is what another web blogger will use to link to your article (or section), or how you might send a link to your story in an e-mail message.
To See the Permalinks, move to your WordPress Dashboard Portal
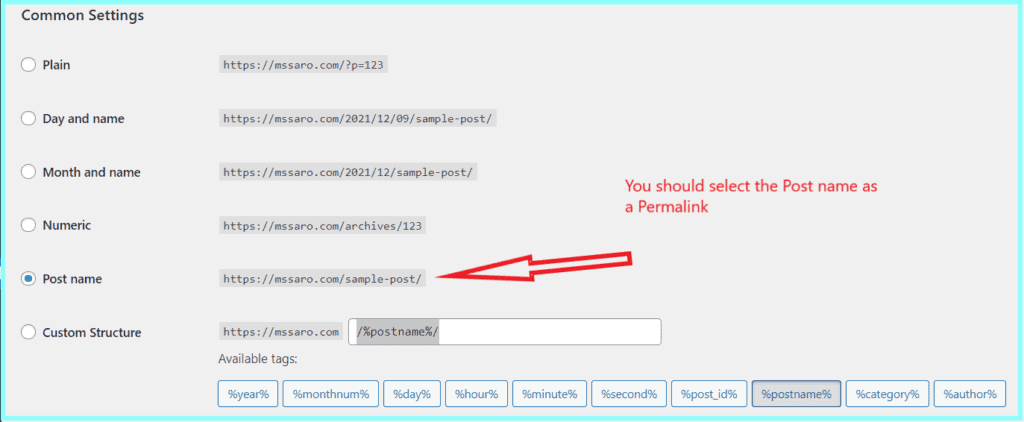
Click on Setting –>Permalinks
Here we see the following types of permalinks structure
Different-2 Permalinks Structure in WordPress
Plain
https://mssaro.com/?p=123
Day and name
https://mssaro.com/2021/12/24/sample-post/
Month and name
https://mssaro.com/2021/12/sample-post/
Numeric
https://mssaro.com/archives/123
Post name
https://mssaro.com/sample-post/
Custom Structure
https://mssaro.com/%postname%/
Under custom mainly other tags are also available here like
/%postname%/
/%year%/
/%monthnum%/ and more…
How to Select Best Permalink in WordPress
If we select the Permalink as plain
https://mssaro.com/?p=123
this URL is not describing your post, which is not suitable for your SEO (Search Engine Optimization) ranking.
You can select as per your website requirement; I would recommend selecting the Post name Here.
In most scenarios, it would be a great choice and you would never regret it.
Why Select Post Name as Permalinks in WordPress
It is very SEO-friendly, as it talks about your post.
You can also target your keyword in this URL.
If you want, you can also select the Custom Structure as a Permalink
And at the end of the permalink, you can append the Year/day/hour/minute/second/postname/category/ etc. based on your requirement
Note: We should avoid changing the permalink setting when our blog has been published.
4# Remove not necessary items from your site
When you install WordPress, you would observe that it comes with some of the default items
- Default Page–> Sample Page
- Default Post–> Hello World
- Remove unnecessary comments
- Remove WordPress theme which you are not using
You need to remove such default items from your WordPress site.
Let’s see them one by one.
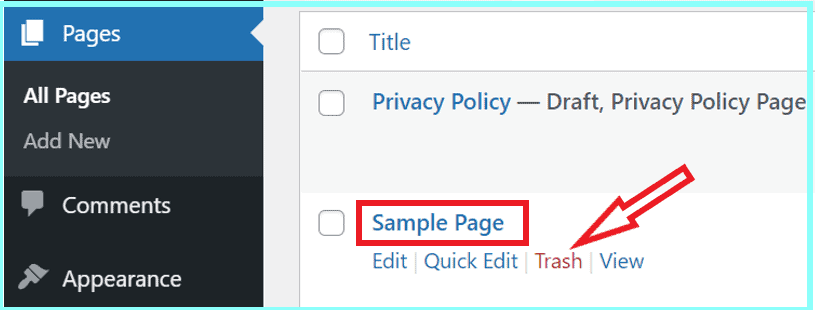
How to Remove Default Sample Page in WordPress
Under WordPress Dashboard, Click on –> Pages
and you would see Sample Page; you should remove this.
Click on –> Trash
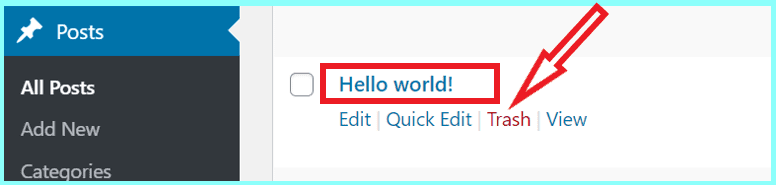
How to remove Default Post (WordPress blog settings)
In your Dashboard, Click on –> Posts
You would see the default Post as Hello world! remove this.
Click on –> Trash
How to remove unnecessary comments in WordPress
In your dashboard, Click on –> Comments
You see the comment list, from where you can select which comment your want to remove. Click on Trash

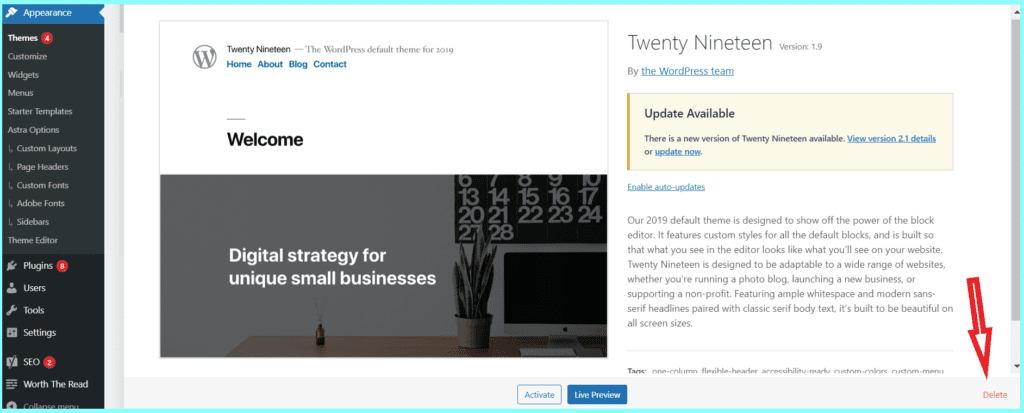
How to remove not using WordPress Theme
When you set up WordPress, it comes with some default themes like
- Twenty Nineteen
- Twenty Twenty
- Twenty Twenty-one
When you finalize any WordPress theme, you usually do not use your above default WordPress themes.
Keep only one default theme installed and delete all other default themes.
I am saying to keep one default theme installed because sometimes you may switch from your main WordPress theme to the default theme in case of some debugging or error handling cases.
In that way, you would save some space on your hosting account, and also you would not be required to update any unused default theme.
Remove Default theme in WordPress
Let’s check how to do this.
Go to Appearance–> Themes
Click on some default unused theme
You would see the Delete button on the right bottom, click on this.
5# Setup General Setting in WordPress (WordPress configuration page)
You can do the following setting.
- Set Up Your Site Title & Tagline
- Set Time zone in WordPress
- Set up your Site Icon (or Favicon)
- Setup Comment in WordPress
You see the below page if you click on Setting–> General
On this page, you may configure many things. Let’s start
Set Up Your Site Title & Tagline
During the setup of WordPress, you added Site Title and Tagline.
Now from here, you can change both.
Click on Setting –> General

Set Time Zone in WordPress
You should set your local time zone in WordPress.
This would be very helpful in many places where you want your website activity to be tracked based on your local region’s time zone.
Click on Setting –> General
On this page, you can configure your
- Time Zone
- Date Format
- Time format

Set up your Site Icon (or Favicon)
If you see some websites, you see the below image as Site Icon.
This is your website logo, which represents your brand.
You can upload this image in WordPress.
Click on Appearance–> Customize–> Site Identity
Here you should upload the website logo.

Note: The size of this image should be 512 * 512 pixels and Square
Setup Comment in WordPress
Under this, you can do some vital settings regarding users’ comments.
Under your Dashboard
Click on Settings–>Discussion

If you find it challenging to check or uncheck, You can set it above (it is my setting).
It would be good enough. Any time you can change this.
6# Setup WordPress SEO
SEO stands for search engine optimization. We use this to increase the traffic to our website.
If You know the importance of traffic on your website, it is excellent. Otherwise, you would soon realize the importance after launching your website.
By the way, WordPress is SEO-friendly, and we can do more to optimize this.
You should install some SEO plug-in from day 1st after launching your WordPress website.
There are 2 most famous SEO plug-ins.
You can use anyone.
- Yoast SEO
- All in one SEO
Any SEO plug-in would take care of your SEO-related things.
I’m using Yoast SEO plug-in on my Massaro website.
You can download the free version of Yoast SEO which has a lot of things. Download Yoast SEO
After downloading, you can refer to How to install a plug-in in WordPress.
7# Setup caching plug-in in WordPress
To speed up your website speed, caching plays an important role.
What is Caching?
When You request some pages to the server, this caching mechanism doesn’t generate the requested page copy at run time, instead caches the copy already and sends back the same copy to you.
That way, it saves a lot of time in receiving the pages and enhances the user experience.
And as a result, load time improves.
There are many caching plug-ins available as follows
- WP Super Cache (free)
- WP Rocket (paid)
Initially, you can start with the WP Super Cache plug-in, which is good.
Download WP Super Cache plug-in.
After downloading, you can install this plug-in to your WordPress.
Just check How to install any Plug-in in WordPress.
You can also check with your hosting account to ensure whether they are providing some caching mechanism or not.
I am using Bluehost as the host, and it provides free default caching setting which is good.
Conclusion: (Important Things to do after creating WordPress Blog)
So make it brief at last; what are the things to do after installing WordPress.
- Add Google Analytics to your website
- Submit sitemap xml file to Google
- Use the Right Permalink Structure
- Remove unnecessary items from your wordPress site
- Setup General Setting in WordPress (WordPress configuration page)
- Setup WordPress SEO
- Setup Caching plug-in in WordPress
Now it is your turn; if you see any other critical basic things I missed in the above least, please share in a comment.
I would be happy to include those.
Keep Smiling and Start Sharing!
Frequently Asked Questions (FAQ) on Essential Settings after Creating WordPress Blog
In your WordPress Dashboard, click on Setting–> General, Here you will get the basic setting in WordPress.
It includes Site Title, Tag line, Time Zone, Date & Time Format, Email Address, etc
How many types of settings are available in WordPress?
If you are not using any other plug-in so normally, in WordPress, you do 6 types of basic settings.
Setting–>General
Setting–>Writing
Setting–>Discussion
Setting–>Media
Setting–>Permalinks
It is the admin portal in WordPress which controls all the activities.
Like Creating new pages, creating new Posts, creating users, Do General settings in WordPress, etc.
Usually Setting screen, you can say default configuration page where you can do some of the essential basic settings in WordPress like your site title, tagline, Email, Time or Date format, etc.